
HPC Software Carpentry - Lesson 1 - Accessing the HPC
Learning Objectives
In this lesson you will learn:
- The overall structure of the JCU HPC
- How to obtain a JCU HPC account
- How to access the JCU HPC
Introducing the JCU HPRC
Hello everyone!
This is the start of our new Software Carpentry series on how to use the JCU HPRC for your research endeavours. But, before we start, let’s first understand what the HPRC is, and how it is structured.
HPRC stands for High Performance Research Computing. Leaving aside the ‘computing’ part of it, we are left with two keys parts: High Performance and Research. The research term is self explanatory, and it tells us that the JCU HPRC is a resource made available by the University mostly for research purposes. The High Performance term refers to the HPRC being a computer (and technically a set of ‘computers’) with capability for resource demanding jobs, thus why it’s defined as ‘High Performance’. To understand what we mean by High Performance and resource demanding, let’s first have a more in-depth look at what the JCU HPC is. P.S. from now on I’ll be referring to it simply as ‘the HPC’ for simplicity.
The HPC Structure
The HPC consists of 2 login nodes (nl01, nl02), a server, a scheduler, 16 computing nodes and one GPU node. The schematic below shows how these interact with each other.
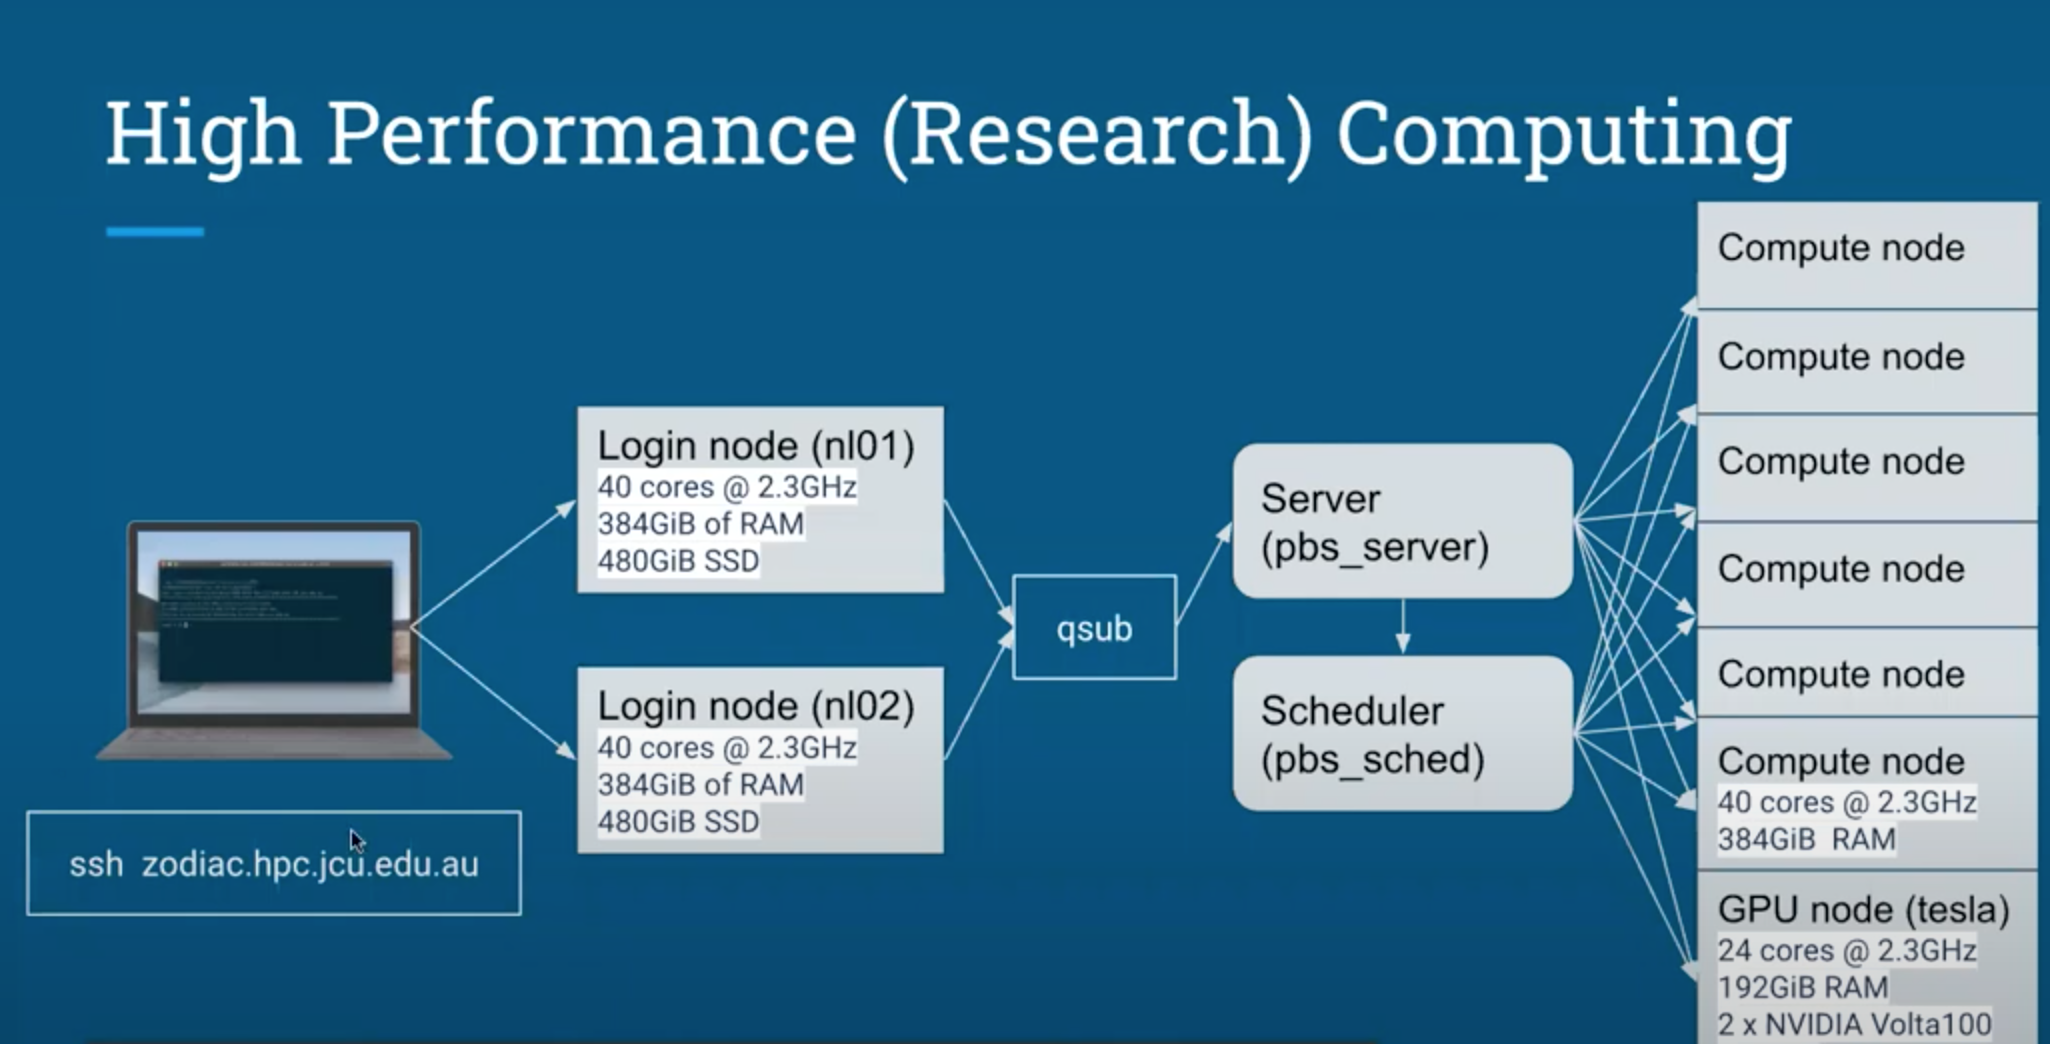
We start with your personal laptop or computer on the far left. Using the ssh command from your terminal (more on this in a second) you can access one of the login nodes. Each one of these nodes can be thought of as a separate computer. In addition, these nodes have multiple cores, we can think of as the brains of the computer. The more brains, the more tasks the computer can run simultaneously. Additionally, these nodes have a lot of RAM, or Random Access Memory. Basically RAM is important as it “gives applications a place to store and access data on a short-term basis. It stores the information your computer is actively using so that it can be accessed quickly.” (more on RAM here). Because of the many available brains (i.e., cores) and the high computing memory (i.e., RAM) the HPC nodes are available to conduct Computing tasks much faster and more efficiently than your average laptop. To put things in comparison, most laptops these days have ~8 CPUs and 8GB of RAM, while each of these nodes has 40 CPUs and 383GiB (411 GB) of RAM.
But, the login nodes are not where you should conduct your large long jobs. These are mostly for, as the name suggests, logging in to the HPC, testing your script on a portion of the data, before submitting the actual job to the compute nodes. This is achieved with the qsub command, which sends your job request to a server (then to a scheduler), and finally to the compute nodes. We will cover in the detail how to submit jobs next week, so for now accept this simplified explanation.
How to access the JCU HPC
The first step to access the JCU HPC is to obtain an HPC account. This is achieved by putting a General IT request from your Service Now portal (accessed here). This usually takes 1-2 days so do it ahead of when you intend to start using the HPC.
Once you have an HPC account, accessing the HPC is achieved using the “SSH” tool (i.e., Secure SHell). This tool is more often ran through the terminal (although see Wytamma’s post on using VSCode instead). So the first step to access the HPC will be to locate and open the terminal on our personal computer. Different operating systems (e.g., Mac/Windows/Linux) will have different terminals that work slightly differently. So let’s look at where to find the terminal and how to use it from the two most commonly used operating systems amongst JCU researchers: Macs and Windows.
Finding the terminal on a Mac
Mac computers come with a terminal pre-installed. The terminal can be found using the searchlight tool, by holding down the command key and pressing the spacebar. In the searchbar that appears type ‘Terminal’ and open the app. This will open up a terminal window.
Finding the terminal on a Windows
The Windows version of the terminal is known as ‘Command Prompt’, or ‘Power Shell’ in newer versions. To find the Command prompt, the easiest way is to right click the Windows icon in the bottom left corner of your screen and then selecting the Command Prompt. The same menu can be opened by clicking Windows Key + X. This parts needs testing and input from an experienced Windows user.
Many more experienced windows user have recommended MobaXTerm, which can be downloaded here. The reason for the recommendation was how it incorporates many tools required for remote computing, including the SSH client (to access/login to a remote computer) and the FTP client (to transfer files between your local machine and the remote computer).
Accessing the HPC
Now that we have terminal/command prompt window open and we have obtained a JCU HPC account, we can finally access the HPC. We will achieve using an SSH Client, or Secure SHell. This tool offers a way to establish a secure, encrypted connection between two sides (e.g., local computer and the HPC), authenticating each side to the other, and passing commands and outputs back and forth.
To do this, we will go ahead and type the following in the terminal window. NOTE: You will have to replace “jc000000” with your unique jc student/staff identification.
ssh jc000000@zodiac.hpc.jcu.edu.au
If this work, you will be presented with a prompt like the one below, asking you to enter your JCU password.

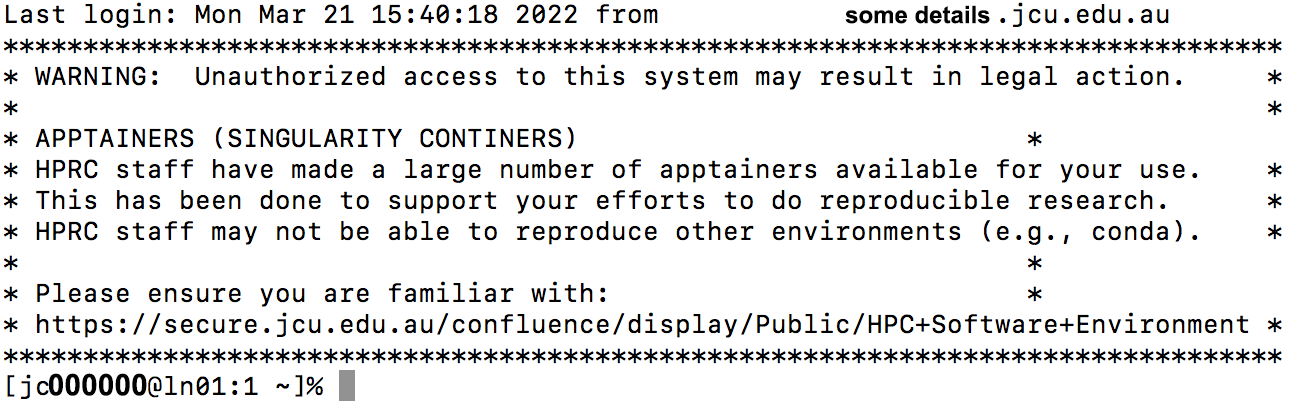
Type the password and press enter. NOTE: you will not see any character appearing as you type your password, for security reasons. Just make sure to type your password correctly at once and press enter. If it work you will successfully be connected to one of the HPC login nodes, and see the following prompt:
Accessing the HPC off campus
Note, that if you are accessing the HPC from off-campus you will have to add a port to your ssh command, like below:
ssh jc000000@zodiac.hpc.jcu.edu.au -p 8822
Conclusion!
Well done, you are now connected to the JCU HPRC, or HPC for short! In the next lesson we will learn how to interact with the HPC using bash. In particular, how to create files and directories, move them, copy them, rename them; and how to transfer files between your local computer and the HPC. See you there!