
HPC Software Carpentry - Lesson 4 - Scripts and submitting jobs
Learning Objectives
In this lesson you will learn:
- How to run R on the HPC in 3 different ways (i.e., interactively, via scripts and by submitting jobs)
- How to write an R script with
nano - How to write a PBS script and submit a job to the HPC
Running R on the HPC
I this lesson I use R as most new students that asked me how to use the HPC usually have some knowledge of R and are often already using it for their analyses. So I use this as a hopefully universal example. With time I will expand on this to add a python example and other things.
R in interactive mode
First of all we will simply start R within the HPC. This will ‘switch our language from bash to R’. Think of this as if you opened R Studio and are now writing your code in R. You can enter one line of code at a time and run it. To do this we type the following:
singularity run $SING/R-4.1.2.sif R
Notice how your command prompt has changed from [jc000000@ln01:2 ~]% to simply >. For now do not worry too much about what this command does. In brief, it is running the singularity command to run the singularity version of R within the HPC. We will cover containers, singularity, etc in next week lesson if you are interested.
For this first example we will use one of the many built in datasets. In particular, the USA arrests datasets containing data on crimes and similar.
First, we load the dataset
data("USArrests")
Now, to plot it let’s use ggplot cause that’s the way to go these days. To use ggplot we will need to load it first. There is no need to install it as it has already been installed as part of the R singularity and been made available to HPC users. A lot of commmonly used packages are already available and should get you started. If you need additional packages the appropriate way is to contact the HPC team and request for the package to be added. The way to do this is through a ServiceNow request. Ggplot is available though so we can simply load it.
library(ggplot2)
And now let’s produce a plot comparing urban population and murders. This is not very informative nor intersting. I will update this with something more relevant at a later stage.
p1 <- ggplot(USArrests) + geom_point(aes(x=UrbanPop,y=Murder)) + theme_classic()
Finally, let’s save this plot as a jpg file
ggsave(filename="murderVspop.jpg", p1, device = "jpg")
And finally to visualise it transfer it to our computer with an scp command. If you need a refresher on how to use those see Lesson 3 of this series on our website.
scp -P8822 jc274669@zodiac.hpc.jcu.edu.au:~/murderVspop.jpg ~/Desktop
R script
This is all fine and dandy. But it can get hard to keep track of your code, making it harder to reproduce it. Say for instance that you receive an update dataset and you want to re-analyse it in the same way. You would have to type all of these commands again one by one. An alternative is to have an R script already with all the steps involved, and you can run the whole script at once.
To do this, we will first exit R with quit(). Then, we create an empty text file with nano. Note how we put .R at the end as an extension.
nano myRscript.R
### load dataset
data("USArrest")

### load packages
library(ggplot2)

### produce plot
p1 <- ggplot(USArrests) + geom_point(aes(x=UrbanPop,y=Murder)) + theme_classic$

### save plot
ggsave(filename="~/murderVspop.jpg", p1, device = "jpg")
Then exit and save your file. Now, instead of running each line of code one by one, we can run the whole script at once with the below command.
singularity run $SING/R-4.1.2.sif R -f myRscript.R
This is much better, we didn’t need to type the lines of code that we already used before one by one, and could chat while waiting for the script to finish running. Note how this is a pretty fast running and simple code. These scripts will come even more handy when you are trying to run long functions.
But, what if while your R script is running you want to do other things on the HPC? or what if your internet connection dies and kicks you out of the HPC? Your script would stop running as well. A solution to this, and the reason why you are trying to learn how to use the HPC, is to submit a job. In the next section we cover how to write a PBS script, and use that script to submit your job.
PBS Script and submitting your job
PBS is the system used to submit jobs to the HPC computing clusters. If you remember from lesson 1 the HPC has 2 login nodes. These are the ones we have been using so far in our first three lessons. They are very powerful themselves when compared to your laptop, but are mostly for testing your code and then submitting it to the compute nodes. The PBS script we are about to write will do just that.
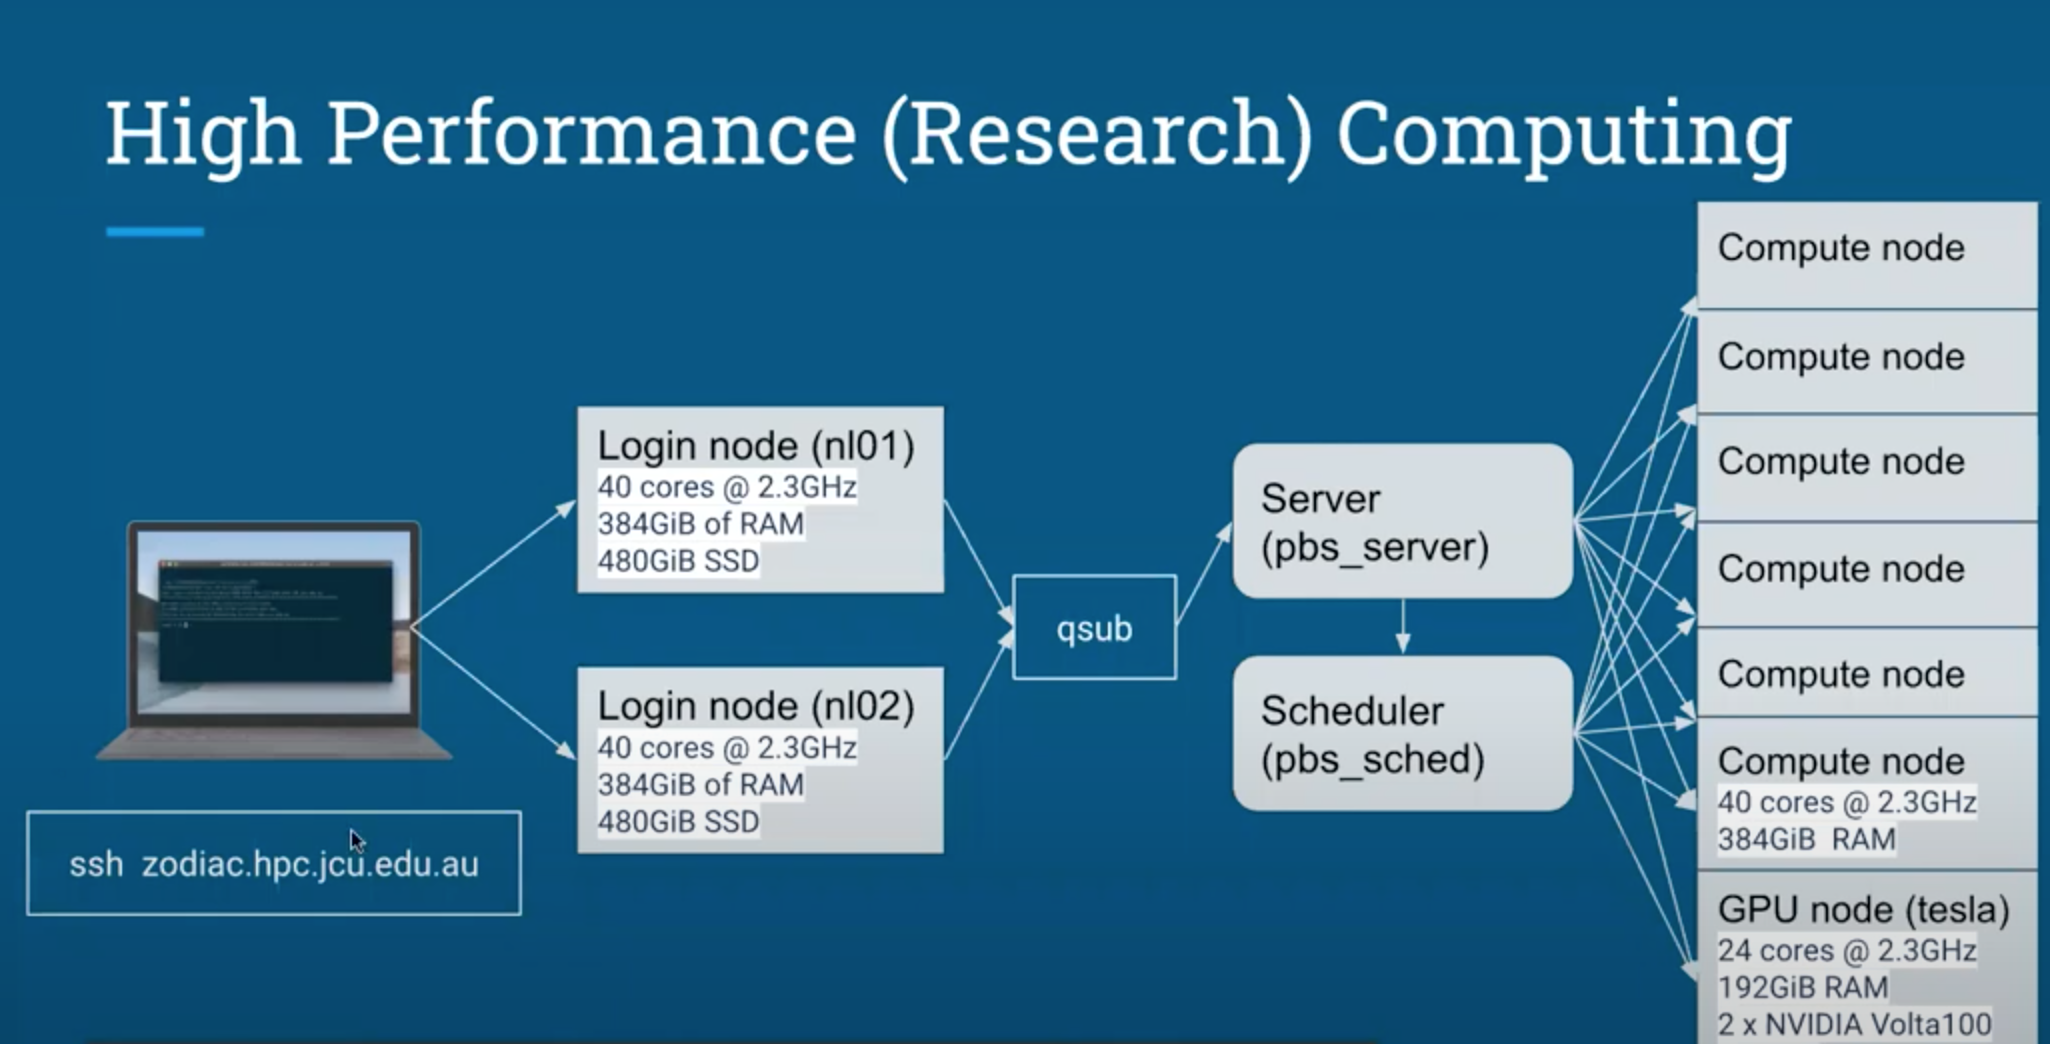
In the PBS script we want to include the informatoin that the PBS scheduler needs to set up the job, followed by the commands that we want executed (in this case running the R script).
So, let’s create an empty text file with nano and start populating it with the required information.
nano myPBSscript.sh
The first line of our script will contain the following: #!/bin/bash. This states what language the script will use. In this case we are using bash.
Then, we will have a few lines beginning with #PBS. These are commands that specify the details of the job we want to submit (e.g., job name, resource requirements, time allowed, etc.). These commands need to come before your executable statements (i.e., the lines where we run our R script).
For this job we use the following PBS commands:
#PBS -N myFirstJob
#PBS -l ncpus=1
#PBS -l mem=500mb
#PBS -l walltime=00:30:00
The first one, with the option -N specifies the name of our job. The second ones requests one cpu. The third one states that we need 500 megabytes of memory, and the last one states that the job should be done in 30 minutes. If your job exceeds the wall time it will be terminated.
Finally, we want to enter the commands that we want to run. In this case this will be the command running the R script.
#load singularity
module load singularity

#run R script
singularity run $SING/R-4.1.2.sif R -f ~/myRscript.R
There are two changes to this section compared to what we did before. First of all this time we had to load the singularity module. If you are familiar with R think of this like loading the package you will need. In this case the singularity module allows us to use the singularity instance of R. If this sounds like gibberish to you, don’t worry. Our lesson next week (lesson 5) will cover singularities, what they are and how to use them in the HPC.
Now, can you spot the second change compared to our previous code for running the R script? It is the ~/ section in front of the script name. This states that the script is in our (the user, i.e., jc000000) home directory. Because for a user the home directory stays the same regardless of what project you are working on, this is a way to provide an absolute path, that doesn’t break whether you run this script from the home directory or from the project subfolder.
So, now our bash script in nano should look like this:
#!/bin/bash

#PBS -N myFirstJob
#PBS -l ncpus=1
#PBS -l mem=500mb
#PBS -l walltime=00:30:00

#load singularity
module load singularity

#run R script
singularity run $SING/R-4.1.2.sif R -f ~/myRscript.R
Let’s exit nano and ensure we save this file. Now we can submit the job with the qsub command:
qsub ./myPBSscript.sh
Congratulations! You submitted your first job through the JCU HPC. This might not feel like it, but it is your first step towards reproducible, robust and most of all hella intersting reserach. So, well done to you!
To check that your job is running smoothly you can use the qstat command. It will return a list of all jobs running with some information:
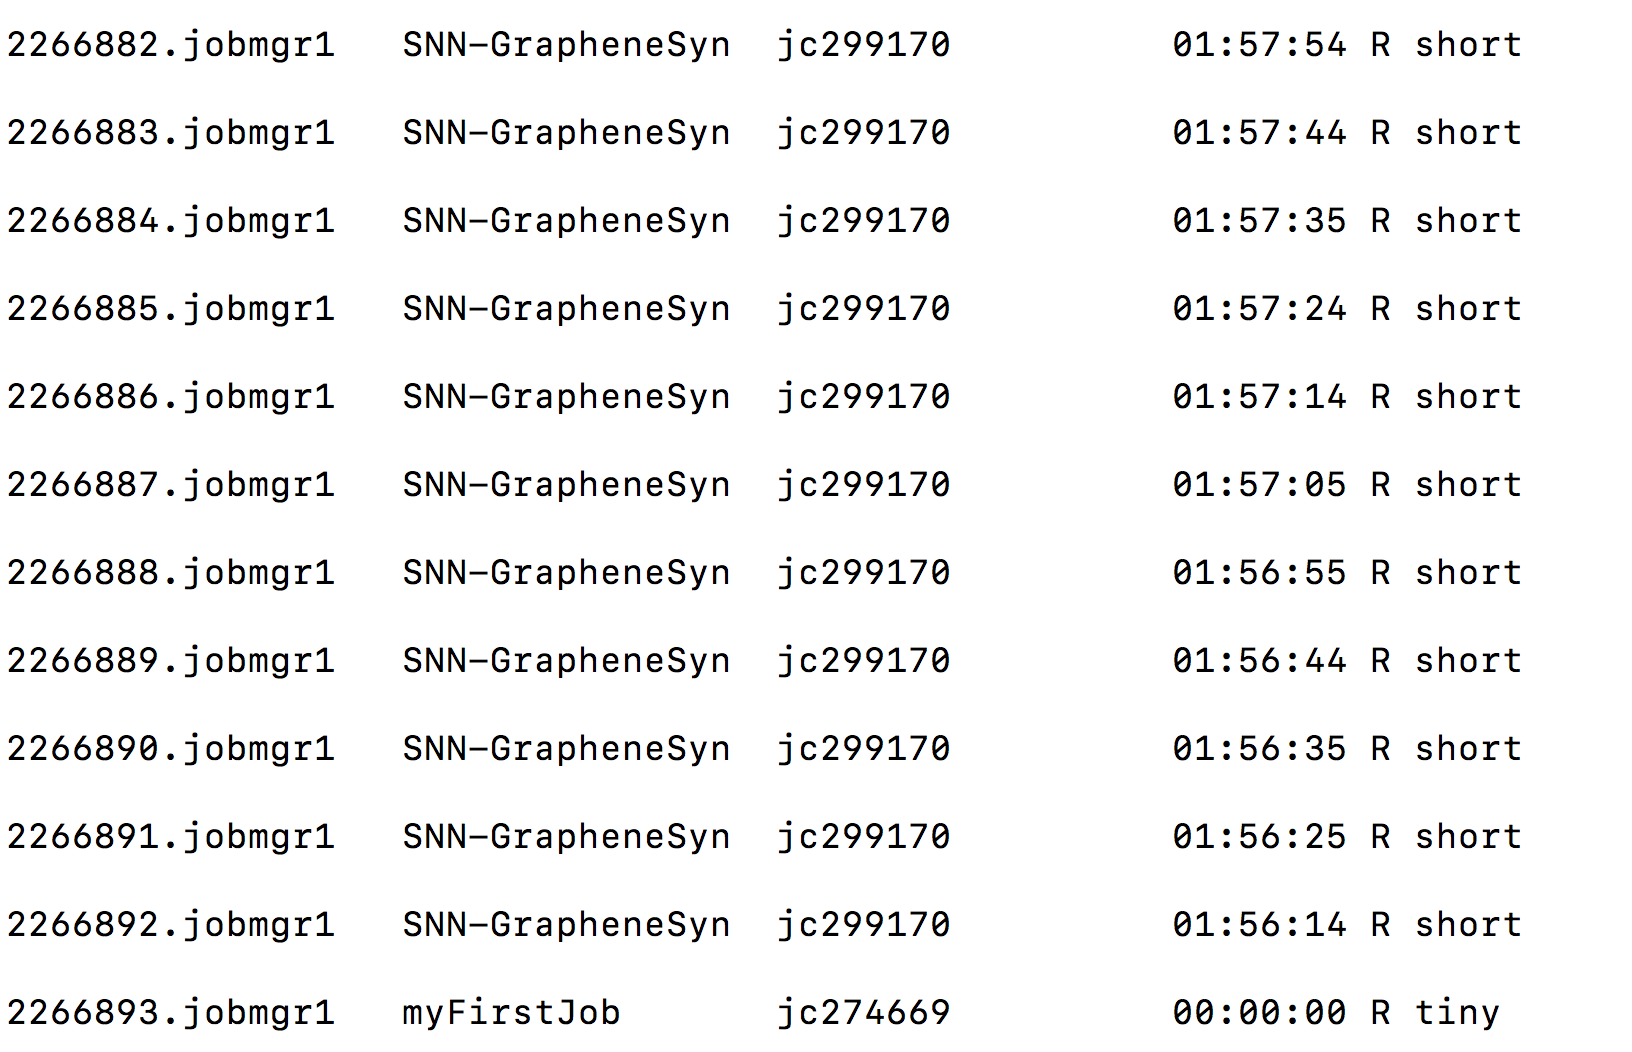
In this example we have on the far left the job ID, followed by the job name, the jc ID of the user that submitted the job, the time it has been running for, its status denoted with R for running and the word tiny stating that this job required few resources and shouldn’t run for long. Sometimes you will see the status as Q, meaning your job has been successfully submitted but it is not running yet because there are not enough resources (e.g., memory or cpus) available.